PICKLE CREEK RANCH
  • Home
    • Contact
  • Cheryl In Texas Art
    • Pixels - Art Prints
    • Fine Art America - Art Prints
    • Redbubble - Art Prints
  • Photography
    • Cheryl's PIXELS page
    • Cheryl's FINE ART AMERICA page
    • Cheryl's REDBUBBLE art
  • Essential Oils
    • Nature at its Best
    • Resources
    • Our Founder - D Gary Young
    • Product Line
    • Monthly Promos
    • Young Living News
  • The Ranch
  • Blog

The Blog Page

Communicating about essential oils, nature, photography, chickens and inspirations along the way.


YLEO SIGN UP

Oh Happy Days!

3/30/2016

0 Comments


Oh Happy Days!
By Cheryl L. McClure

Picture
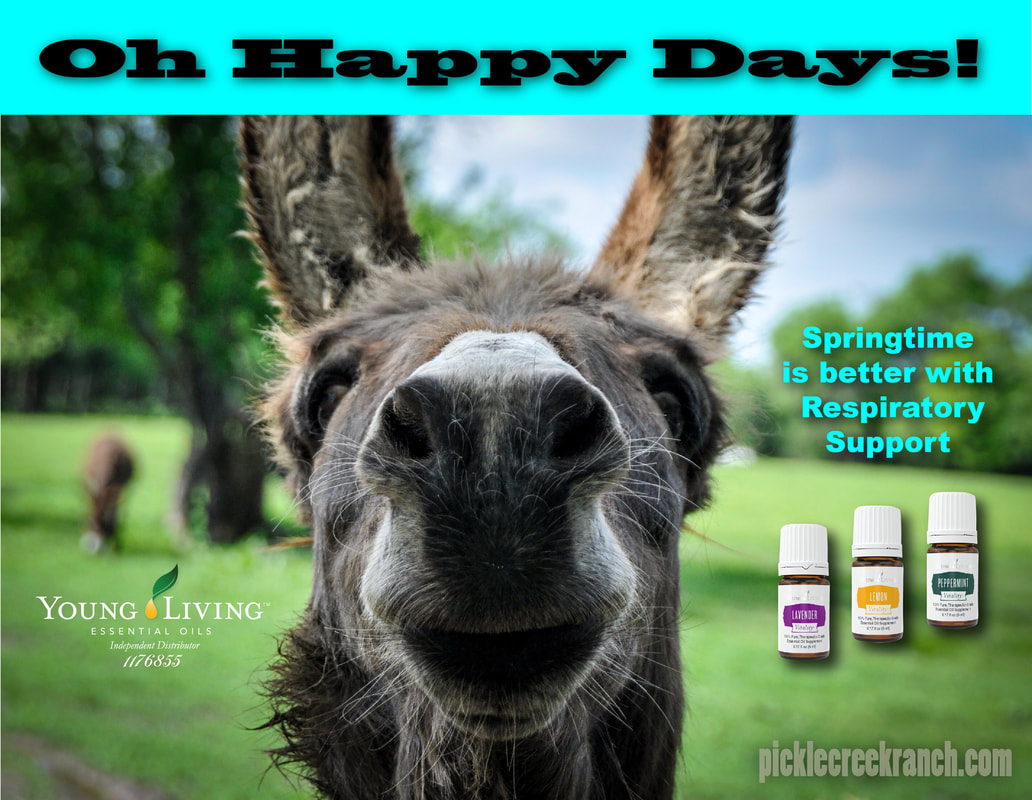
Don't be stubborn! You don't have to tough it out - there's help!! Lavender, Lemon and Peppermint are a great trio to have on hand any time of the year. They are great together for supporting the respiratory system.

Vitality oils are labeled as supplements so that you can take internally. For example, 3 drops Lavender Vitality, 3 drops Lemon Vitality and 3 drops Peppermint Vitality. Add them to NingXia Red or put in a capsule with and 3 drops carrier oil (coconut or olive oil will work). You're welcome! 

On their own, there are also many other uses. Lets look at each one individually.

Lavender - Topical 
Ingredients: Lavandula angustifolia  (Lavender) oil

Has a calming and soothing fragrance. It makes a nice linen spray: 8 drops Lavender + 4 oz spray bottle (like this) of distilled water. Lavender is also a relaxing addition to skin care products and it’s great in the bath. Mix with epsom salts and soak in the tub!!

Lavender Vitality™ - Supplement
Ingredients: Lavandula angustifolia  (Lavender) oil

With a sweet, slightly floral flavor, it pairs well with many foods. Use Lavender Vitality™ essential oil to add this delightful flavor to your meals. It is complimentary with dairy in shortbread, pound cake, ice cream, meringue, or whipped cream recipes.

Lemon - Topical
Ingredients: Lemon (Citrus limon) peel oil

Did you know it takes 75 lemons to make one 15 ml bottle of Lemon essential oil? It is energizing, cleansing and is used for circulatory support. Just the smell alone is uplifting!

Lemon Vitality™ - Supplement
Ingredients: Lemon (Citrus limon) peel oil

Add Lemon Vitality™ oil to fish, chicken or even pastries and cakes. Yum! Add a drop or two to your glass of water each morning to start the day off right!  Or you could add 1-2 drops to a vegetarian gel capsule and take daily or as needed.
You will want a
​glass water bottle something like this:
Because lemon eats plastic. Just saying'.

Peppermint - Topical
Ingredients: Peppermint (Mentha piperita)† leaf oil

This oil is energizing and it supports digestion. Apply a drop or two of Peppermint to your head and neck for a little boost of positivity. I used to put a drop in my palm, rub palms together and cup my nose to breathe in. It helped me a lot when I was sitting at a desk all day behind the computer. Try diffusing with other oils like Rosemary, Spearmint or Sage.

Peppermint is a key ingredient in PanAway®, AromaEase®, Aroma Siez™, Relieve It™, and Deep Relief™ Roll-On essential oil blends.

Peppermint Vitality™ - Supplement
Ingredients: Peppermint (Mentha piperita)† leaf oil

This is a versatile oil and it’s flavor is well liked! It can support healthy gut function and digestive efficiency. Add to water or tea or even a workout drink like NingXia Red or NingXia Nitro.

This is another oil you can add a drop to a glass of water for a refreshing start of the day. Personally, I like it in my herbal hot tea at night!
Picture
​Add a couple of drops to one chocolate bark bar (like this) when you make chocolate dipped pretzels (like these) for a special treat! 

I hope this gives you some ideas for using your oils. If you notice, each of the oils has a Vitality version. This way, when you see a Vitality oil, you will know for sure that you can ingest that type of Young Living essential oil. Note the same ingredients but a different label.

​
There is so much to gain when you do your research. There are even more ways to use these valuable oils. I hope you will take charge of your health and enjoy the benefit, because you chose to make it the best it can be!


Every drop of healthy change adds up! Shop here> Choose Onsie, Twosie or Best Bang for Your Buck!

Happy Oiling!
Cheryl @ Pickle Creek Ranch
​yldist.com/cherylintexas

0 Comments

How to Move a Greenhouse

3/29/2016

1 Comment


How to Move a Greenhouse
By Cheryl L. McClure

Picture
Have you ever wondered how to move a gigantic THING? I’m talking structures like a henhouse or a greenhouse.

How lucky we are! A friend of mine called and told us they knew someone who had a greenhouse in their backyard and just needed it removed. Take it away. Free! We didn’t know what kind but Jan Paul, being the handyman he is, went to check it out. It was a 8 x 15 ft fiberglass greenhouse that needed some TLC once we got it home. It took some work to get it out. The owner had workers at their house to help Jan Paul lift it and set it up on his trailer. Then came the task of anchoring it down for the hour + ride home down the highway. He strapped it in and secured it for the ride. 

It had been so windy the last week or so, he kept it tied down to the trailer. We finally go a break and were able to move it off the trailer and into position between the duck pen and the compost piles - and additional composters we received when our son-in-law bought an abandoned house. This was our lucky week. Woo Hoo!

Anyhow, I set this up in a slideshow so you can see how gradually and easily Jan Paul made this work. It astonishes me the way he can take what I see as a monumental task, and turn it into a seamless structured activity that accomplishes the goal. He did basically the same thing when moving the henhouse from the ranch to the country house.

Note the back of the greenhouse was at the front of the trailer so we couldn’t just back the trailer in position and slide it off. We had to slide it off the side and pivot the greenhouse so the door would land in the front.
  1. After getting the greenhouse home: The edges of the greenhouse were lifted or braced up and treated 1x6 lumber was slid under and screwed to the underside of the lip. He also put 1x6 on top of the lip sandwiching it.
  2. Regular 2x4s were then placed perpendicular under the 1x6s and going across the trailer to the other side; screwed in place for bracing.
  3. After pulling the trailer in position, an additional 12 ft - 2x6 was added across the front and one was added across the back, attached to the treated pieces underneath. An additional 2x4 (side brace) (full length of greenhouse) was screwed under the 12 footers. Now the side brace will make it easier to slide down the “ramp” made of additional 2x4s leaning between the existing braces underneath.
  4. The yellow straps were secured so that we could push the greenhouse and it would tilt and slide but not go all the way down the ramp. They were attached to the trailer and then wrapped around the long 2x4 side brace that ran parallel to the greenhouse. So we would push a little and then release the strap a little and then push some more.
  5. Once it was at ground level, two of the 2x4s were then moved under the side brace. Jan Paul, using another strap at the opposite end, was able to slide it across the 2x4 pivoting the greenhouse.
  6. Using leverage, he lifted the bottom so I could slide the PVC underneath. This allowed us to roll it in position. We had an additional piece of PVC that ran past the width of the greenhouse, so with two of them, we were able to easily move it further back or forward to our desired location.
  7. We removed the additional bracing with leverage from a shovel or 2x4 to lift the edge and then placed bricks under the treated lumber. A little shoveling of dirt and so forth was needed to get it level. 
Oh, and see, I was just mainly there for moral support. LOL He could have done this whole thing by himself. Amazing. Next we move the burn barrels...
Picture
But we are not done yet! Normally this greenhouse is sunk in to the ground about six inches, but we are going to anchor it and fill the inside with gravel. 

The fiberglass is a bit worn and needs a new coating so it still needs to be cleaned and coated. Jan Paul is also planning to build a frame and glass door for it, plus the windows/props need some adjustment and repair. But all in all this will make a great place to put our patio plants in the winter time and start or even grow veggies in the winter! 

Do you have any tips on greenhouse gardening? I’d love to know!!
With the chicken yard, coop and henhouse, duck pen and greenhouse, we are going to call this the Duckominium Complex. Once we get the greenhouse in shape we still have plans for improvements on the henhouse and the duck pen. It’s all good. It’s all fun! If you want to see how we built our henhouse with repurposed materials you can see the article called Henhouse from Scratch.

The best part is, we didn’t need any Pan-Away or Deep Relief or Orthosport after this. But you can bet I have it on hand for when we do!! Be ready for the next time you have worked extra hard and you want relief.  Find your relief here> YL Essential Oils

​Happy Gardening!

Cheryl @ Pickle Creek Ranch
1 Comment

But I'm So Cute!

3/24/2016

2 Comments


But I'm So Cute!
By Cheryl L. McClure

Picture
I’d like to share about Thieves and Purification, two of my favorite essential oils. You could say these are man’s best friend.

We have this thing about living in the country. We love it, but don’t love the fragrance that surrounds us when skunks spray!! 

Now, Chester, our energetic dog, whom we love with all our hearts, is pretty intense about finding other animals. In fact he makes a pretty good mouser but he hasn’t learned his lesson about skunks because he still insists on chasing them if he sees one or smells one.
Picture
Yes, these pictures were taken at the ranch.
Let's see how close we can get without getting sprayed by the skunk! LOL. Thank goodness for the zoom lens. 
One time he had wandered off and chased down a skunk only to come back and stink up the entire front porch of the cabin. It was really pretty funny because Jan Paul called me that day and asked me where my special spray was. I had already made up the spray using Purification and purified water in a small spray bottle. I use it to spray on my clothes when I go for a walk too. It makes for a more pleasant, carefree experience outside.
​
Picture
Anyway, Jan Paul went out and sprayed the front porch a few times AND the dog. It knocked out the smell on the porch and if my memory serves me, the dog smelled much better too. Not to say that he didn’t need to wash the dog, but it was enough to clear it up and make it bearable to get him a bath!
Picture
Another time, we found a dead skunk in one of the barns. It had been there for a few days and it was REALLY repulsive. This called for the big guns - I mean more drops to make sure that there was NO smell to gag Jan Paul when he went out to remove it. It was bad. How bad? Oh, it was B - A - D. I’m not as sensitive as Jan Paul and it gagged me, so I took care of the smell so that he could get rid of the dead skunk. I’m telling you, I added about 20 drops into my bottle and sprayed about 4 oz of it on and around the dead skunk. It worked well enough so that he could breathe and get it out of there. The following day you would not have known what had transpired the day before. 

Purification is well liked for it’s fresh and clean smell anyway so it can be used in in your diffuser or spray bottle. It is a blend of the oils Citronella, Lavandin, Lemongrass, Rosemary, Myrtle, and Tea Tree.

You could make up your concoction and put a cute label on it.  It’s a good idea to know what’s in your spray bottle and sometimes I write the list of ingredients so I will be able to duplicate it when empty.

Just think of all the possibilities where you could use this spray! I’d say, um, anywhere the smell is just not right!!
Picture
I also carry Thieves spray in my purse ALL THE TIME. You can find it here already mixed> bit.ly/1MoCNCM or you could make your own. 
​
You never know when you might need to spray it in the car to freshen up the air. We have driven across country several times and you don’t even have to do that to run into an area that is stinky. It could be a dead skunk on the road or a sewer plant or sometimes you don’t know where it came from but it’s enough to choke a person. I shut off the outside air and get out the spray. Usually one squirt is all it takes in the car/truck and the smell is eaten up! 

Thieves spray is also good to have on hand if you need to sanitize your hands. It’s a good all around spray. And like I said in the beginning.... 

Picture
If you haven’t tried Purification or Thieves yet, I encourage you to add them to your collection of good oils for a good life! 

When you are ready to order, use my member number 1176855 to get the best bang for your buck here> Starter Bundles or for retail prices
Thieves Spray (which I carry at all times!)
Thieves Essential Oil (singles to make your own sprays)
Purification Essential Oil (singles to make your own sprays)

Happy Oiling!
​From Cheryl @ Pickle Creek Ranch
Member Number 1176855


2 Comments

Vegetable Gardening with Raised Beds

3/13/2016

0 Comments

 
Picture

Vegetable Gardening with Raised Beds
by Cheryl L. McClure

Last year we moved to the country house, which is not far from the ranch, but a better place for us to garden since we wake up there every day!! We started our first raised bed by moving the one we had in Dallas. Jan Paul literally dug up the dirt and filled containers, removed the frame and brought it to the country house, installing and filling it back up with our good dirt. And I say this was good dirt because he had mulched leaves and clippings in a composter to make it and it was rich and full of nutrients!! We grew squash, basil and peppers. We also used a couple of molasses lick tubs (for the cows) filled with dirt/mulch and compost.
Picture
We wanted to expand our garden and he had some leftover 2 x 6  lumber, so made two 2-1/2 ft  x 12 ft raised beds next to the tubs. We ran our beds from east to west.
Picture
First he had to level them out somewhat and then put cardboard boxes and feed bags on the bottom and up the sides. We used the cardboard and feed bags to inhibit the weed and grass growth. He watered that in. OOPS! I got carried away and forgot to take a picture of this specific phase but you can see the cardboard sticking out!
Picture
A while back, a road crew was out by the ranch trimming trees. Jan Paul asked them if they wanted to dump their mulch on our property so that we could use it. It was a win win for them since they didn't have to go so far away to empty their dump truck! It sat in piles next to the Pickle Creek Ranch Botanical Garden for a year or so. It was a win win for us since we used it here and there to fill in holes in the driveway and basically let it start breaking down. Then I used some in the PCR garden around Desert Orchids I had planted from seed. We figured the wood chips and sticks would make a good base for the raised beds on top of the cardboard, so in it went and that was watered in as well!
Picture
Next, Jan Paul shoveled sandy loam on top of all that, knowing this will all break down the layers below and watering it in. I gotta tell you this man is a keeper!! He is fun to be with and makes me laugh! He is so focused when it comes to these projects and not only is he good with gardening, he's good at building, plumbing, electrical, masonry…. I don't think there's anything he can't do! Ok, back to work now...
Picture
We added wood chips on the sides as well and left the top exposed till the seeds sprouted. I think Jan Paul is also happy to do all this since he knows I'm going to be cooking up some delicious home grown veggies!! LOL 
Picture
After the seeds sprouted, we added the finer hardwood mulch around them. I threw some marigold seeds along the edges as well in hopes they will come up and provide some pest control.
Picture
We set up fencing for the peas to climb on and the next bed has arugula, kale and spinach. We are happy gardeners, happy that we have the space and can grow our own food organically!! It tastes so much better than what you get at the store. Since this is the first year for the long raised beds we are not going to expect the dirt to be as good as the richer bed that has more nutrients from the decomposing process. I'm sure by next year we will be finding the big fat worms in those beds that we are finding in our original bed. 

PS - If you haven't planted yet, don't forget your Poblano Peppers and be sure to check out what I did with mine!! >> Poblano Pepper Powder and when I had too many green tomatoes >> Green Tomato

Happy Gardening from Cheryl @ Pickle Creek Ranch

Picture
We like it in our little world here! #countryliving
0 Comments
    Picture

    Cheryl L. McClure

    Young Living Distributor
    #1176855

    I have retired from the corporate world and now enjoy keeping chickens, ducks, working in the garden and cooking more than ever before!

    More below...

    Categories

    All
    Art
    Bathroom
    Birds
    Butterflies
    Cats
    Chickens
    Cleaning
    Community
    Cooking
    Decor
    Diy
    Ducks
    Edible Landscape
    Essential Oils
    Fire Starters
    Free
    Gardening
    Healthy
    How To
    Instant Pot
    Local
    Make Your Own
    Nature
    NETT
    Rainwater
    Ranch
    Savings
    Tools
    Travel
    Volunteering
    Young Living


    ​Blog Posts:
    PV Assistant
    Malabar Spinach
    ​Throne Scents
    Clean House
    Shrimp
    Weight Management
    Black Swallowtail
    Gluten Free Brownies
    Mint Tea
    Hummingbirds
    Minty Cabbage Slaw
    Respiratory Support #1
    Respiratory Support #2
    Respiratory Support #3
    How to Move a Greenhouse
    ​But I'm So Cute!
    Raised Bed Gardening
    NETT Cleanup
    Exercise at the Ranch
    DIY Chicken Treats
    DIY Fire Starters
    Poblano Pepper Powder
    Green Tomato Weekend
    MYO Nitey Nite EO rollon
    Essential Oils and Chickens
    ​Diffusing Essential Oils
    Longhorns at the Pound?
    What's in your Trough?
    Using Rainwater at the Ranch
    Raindrop with Young Living
    Young Living Price Comparison
    Young Living - Beginner Tips
    The Essential Oil Bottle 
    Sage Essential Oil
    Ear Support and EOs
    Crape Myrtle Surprise
    Quick Cat Shelter
    Chemists's Perspective on YL
    The Athlete
    Chicken House Reveal
    Campus Health
    Concentration
    Accidents and Essential Oils
    Young Living Farms
    Kid Scents Collection
    Itchy Skin
    ​Probiotic - Life 9
    Turmeric and AgilEase
    Enjoying the Harvest
    ​
    Diffusing the Ocean Breeze
    The Lavender Farm
    An Ounce of Prevention
    Traveling with Essential Oils
    The North Sulphur River
    DIY Bleach
    Reflection of Tears
    ​MYO Lotion Bars - DIY
    Zucchini Boats
    Instant Pot Cilantro and Lime Rice
    Instant Pot Zuppa Toscana Soup
    Fresh Guacamole Please!
    Instant Pot Tomato Sauce
    Honey Lavender Lemonade
    Honey Lav/Lemon Ice Cubes
    Tools For The Garden
    Veggie Tian from the Garden

    Archives

    November 2024
    August 2024
    May 2024
    April 2023
    December 2022
    July 2022
    June 2022
    March 2021
    January 2021
    November 2020
    September 2020
    August 2020
    July 2020
    May 2020
    February 2020
    August 2019
    March 2019
    January 2019
    May 2018
    February 2018
    December 2017
    August 2017
    July 2017
    June 2017
    May 2017
    February 2017
    January 2017
    October 2016
    August 2016
    July 2016
    June 2016
    May 2016
    April 2016
    March 2016
    February 2016
    January 2016
    November 2015
    September 2015
    July 2015
    February 2015
    January 2015
    November 2014
    October 2014
    September 2014
    August 2014
    July 2014
    June 2014

    CONTACT INFO
    It's probably pretty obvious I love nature and art. Nature and landscape photography is a part of everyday life at the ranch. There are some pieces available as works of art that I would like to share with you!

    I only recommend Young Living essential oils because I am confident in their purity and the quality of their essential oils and other products. I am not a doctor. The information I post on this website is for educational purposes only. Young Living supplements are designed to improve nutrition; they are not intended to diagnose, treat, cure, or prevent any disease. However, scientific research has established a connection between nutrition and we all know better nutrition leads to better health.

    Please consult with the medical professional of your choice whether using essential oils or not. Remember that being proactive and taking responsibility for your health is in your own best interest. Dig in, research and make wise choices. I encourage you to see what others have done with essential oils and supplements by visiting Oil-Testimonials at http://www.oil-testimonials.com/.

    I hope that this website and blog will provide you with helpful information and resources to achieve your desired goals!!
    ​
    Feel free to contact me if you have questions or concerns as I am here to help and hopefully point you in the right direction!​

    RSS Feed

    Go to> • Home • Cheryl In Texas Art • Photography •  Essential Oils • The Ranch • Blog
Web Hosting by iPage
All photography and graphics crafted by Cheryl L. McClure • does not include iPage template